Can you build furniture from frame profiles?
Staring at a pile of frame profiles and connectors without a trade background feels intimidating. One slip can ruin parts or cause injury. Plain steps make it manageable.
Published
Yes, you can build furniture from frame profiles without a trade background if you follow the supplier's assembly instructions, prepare a clear workspace, inspect and clamp your tools and materials, and test the finished frame for squareness and stability before use.

Whether you are putting together a single table at home or organising a group build, the sequence stays the same. These four questions walk through what the work involves, what to prepare, how to handle a drill safely, and how to check the finished piece.
What does building from frame profiles involve?
Many first-time builders assume frame assembly requires heavy workshop machinery. That worry keeps people from starting simple projects. In practice, pre-cut systems rely on careful preparation and patience.
Building from frame profiles involves reading the supplier's drawing, sorting and checking every part against the parts list, joining the profiles with the specified connectors in order, and checking that the frame sits square and stable at each stage.
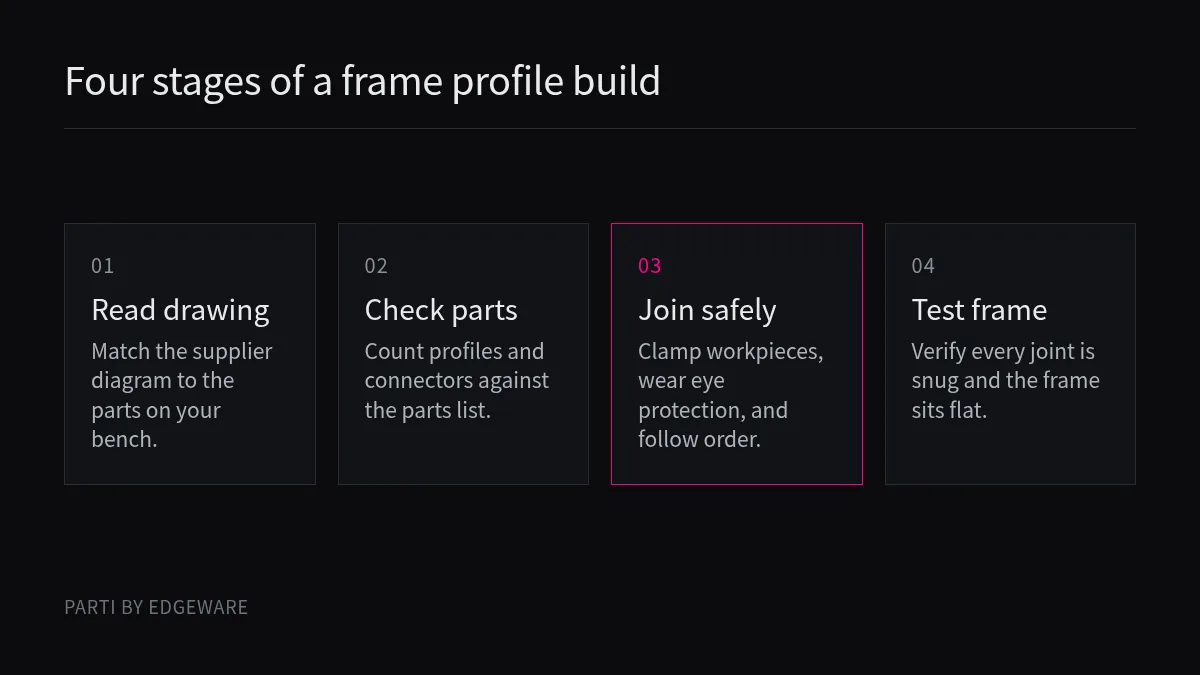
Working from a drawing instead of guesswork
When you build with frame profiles and connectors, the supplier's manual does the heavy engineering for you. You do not need to invent joints from scratch. Instead, your main job is translation: matching the diagram on the page to the physical pieces on your floor or workbench. Every system has its own rules, so we always defer to the supplier's instructions on orientation, fastener tightening, and assembly order. If you are planning a group build or looking at how a café can double as an event space, you can also browse our community events page to see how beginners work together in a shared room.
The core sequence from box to frame
Rushing straight to the tools is the most common mistake we see. A calm build follows a clear order:
- Unpack and group identical profiles and connectors together on a clean, flat surface so nothing rolls away or gets scratched.
- Count every piece against the supplier's parts list before you tighten a single fastener. Finding a missing part halfway through a build wastes time and forces you to undo work.
- Dry-fit or lay out the first sub-assembly on the floor so you can see how the corners meet and which way the profiles face.
- Join the first section loosely if the supplier's instructions allow it, check that it sits flat and square, and then bring the fasteners to their specified tightness.
We do not know which profile system you have on your bench, and connectors vary widely between suppliers. Never force two parts together if they resist; stop and re-read the drawing to see whether a piece is flipped or out of sequence.
What do you need before you start?
Starting a build with faulty tools or a cluttered floor invites accidents. Taking time to inspect your gear and plan how you lift heavy parts protects you.
Before you start, read the operator's manual for every tool, inspect drills, cords, plugs, and batteries for damage, set up clamps to hold your workpieces, wear appropriate protective equipment like safety glasses, and plan how to lift heavy materials safely.
Tool and workspace checks
In Canada, the Canadian Centre for Occupational Health and Safety (CCOHS) sets out basic safety rules for electric tools1. Other places have different rules, and your own contract and local authority decide what applies to your site or event. Before you pick up a powered hand tool, CCOHS advises ensuring you are trained to use it safely, reading the operator's manual, and operating it according to the manufacturer's instructions. Use only tested and approved tools, and make sure the tool has the correct guard, shield, or attachment recommended by the manufacturer.
Inspect every tool for damage before each use. Check the handle and body casing for cracks, and verify that any auxiliary or double handles are installed securely. Check switches for damage or faulty trigger locks. If you use corded tools, inspect the cord for cracking, fraying, or insulation faults, and check the plug for cracks or missing, loose, or faulty prongs. CCOHS notes that electric tools must be properly grounded with a three-prong plug in a grounded outlet, be labelled as double-insulated, or be powered by a low-voltage isolation transformer, and you should never remove the third grounding prong. Test tools for effective grounding with a continuity tester or ground fault circuit interrupter (GFCI) before use.
If you use battery-powered tools, use only the battery and charger specified by the manufacturer. Inspect batteries for cracks, leaks, or swelling, keep terminals clean and free of corrosion, and store battery packs so no metal parts like nails, screws, or wrenches can touch the terminals and cause a short, sparks, or burns. If any tool is defective, remove it from service, tag it clearly as "Out of service," replace it immediately, and leave repairs to a qualified person instead of attempting field repairs. For more help setting up your kit, read our guide on how to prepare for your first drill build.
Protecting your body and planning lifts
Wear personal protective equipment suited to the task, such as safety glasses, goggles, or a face shield (with safety glasses or goggles), along with hearing protection, gloves, or safety footwear where appropriate. Set up clamps or a vice to hold the piece you are working on whenever practical, freeing both hands to control the tool.
Moving boxes of profiles and finished frames also takes care. In Great Britain, the Health and Safety Executive (HSE) publishes a brief guide on manual handling at work2 under the Manual Handling Operations Regulations 1992, explaining how employers assess lifting, lowering, carrying, pushing, and pulling tasks to reduce musculoskeletal injury risk. Even in a small workshop, think through how you will lift and carry bundles of profiles before you start.
How do you drill and join safely?
Holding a spinning power tool for the first time makes many people tense up. Knowing what to do and what to avoid keeps the bit under control.
To drill and join safely, wear safety glasses, disconnect power before changing bits, tighten the chuck securely, clamp the workpiece so both hands control the drill, keep your footing balanced, and never hold the material in one hand while drilling with the other.
Setting up the drill and bit
In Canada, CCOHS provides specific guidance on working with powered hand drills3. Always follow the manufacturer's instructions when selecting and using bits or attachments, especially when the drill or task is unfamiliar. Choose sharp, straight bits that match the drill's size and capacity and suit the material you are drilling; never use bent bits or exceed the manufacturer's recommended maximum drilling capacities.
Before inserting or adjusting a bit, switch off the tool and disconnect the power supply or remove the battery. Seat the bit properly and tighten it securely in the chuck so it turns true without vibration or imbalance, and remove the chuck key and any adjusting wrenches before starting the drill. You can review more group workshop habits in our guide on what keeps first-time builders safe during assembly.
| Phase | Safe action to take | Hazard to avoid |
|---|---|---|
| Before drilling | Inspect cord or battery, wear safety glasses, and clamp the workpiece securely. | Using a frayed cord, cracked battery, bent bit, or leaving the chuck key in. |
| During drilling | Keep both hands on the drill, keep air vents clear, and drill a small pilot hole for large holes. | Holding stock with one hand while drilling with the other, or using excessive force. |
| If a bit jams | Unplug the drill or remove the battery first, then free the bit from the workpiece. | Starting and stopping the drill repeatedly to free a jammed bit. |
Safe operating habits at the bench
When you are ready to drill or drive fasteners, secure the workpiece with clamps so it cannot twist or spin. Never drill with one hand while holding the material with the other, and never reach under or around the stock being drilled. Keep proper footing and balance without overreaching, and use the auxiliary second handle for large-scale work or continuous operation.
Keep the drill's air vents clear for ventilation, and keep power cords out of the cutting area and tool path. Never carry or hang a drill by its cord, and never use an electric drill in wet or muddy locations. If you are drilling a large hole, drill a small pilot hole first to improve accuracy and reduce stress on the bit, and never use a hole saw cutter without a pilot drill or use high-speed steel bits without cooling or lubrication where required. Avoid forcing the drill into hard material; reduce speed instead, and slow your feed rate just before breaking through the surface. If a cord feels more than comfortably warm or a tool sparks, stop and have an electrician or qualified person check it.
How do you check the result?
Tightening the last connector feels like the finish line. Putting weight on an unchecked frame can bend parts or tip the piece over. A calm inspection catches mistakes early.
Check the finished furniture by disconnecting and storing your tools, verifying that every connector matches the supplier's drawing, testing that the frame sits flat without rocking, confirming all fasteners are snug, and checking stability before putting the piece into regular use.
Clearing the bench first
Before you inspect the furniture, make the workspace safe. Switch off your tools, disconnect them from power or remove their batteries, and store battery packs where no metal hardware can touch the terminals. Clear scrap, packaging, cords, and hand tools off the floor so you have room to walk around the piece without tripping.
Running a methodical frame check
Walk around the finished build with the supplier's assembly drawing in hand and check four things:
- Compare every joint against the drawing to confirm no connector, bracket, or fastener was skipped or installed backwards.
- Set the piece on a flat, level floor and press gently on opposite corners to see whether it rocks or twists.
- If the frame rocks, follow the supplier's instructions to loosen the affected joints slightly, square the frame on the flat surface, and re-tighten the fasteners evenly.
- Check that no sharp burrs, loose hardware, or protruding edges remain where someone could catch their skin or clothing.
Only after the frame sits flat and every joint matches the supplier's instructions should you move it into place, using safe lifting posture or a second pair of hands if the piece is awkward or heavy.
Conclusion
Building furniture from frame profiles takes patience instead of trade training: read the supplier's manual, inspect and clamp your tools, and check every joint.
About Parti
Parti by Edgeware is Edgeware's first industry solution. Parti Race is a build day where people put karts together from frame profiles with a drill, and the events page shows photos of it. The first café is planned for Hangzhou and is not open. This guide is general information, with a safety focus, for first-time builders and people organising a build day, not a manual for any product, and the instructions that come with your own parts and tools come first.
Sources
- CCOHS: Powered hand tools, electric tools, basic safety: Read Canada's checklist for inspecting cords, plugs, batteries, grounding, and personal protective equipment before using electric tools.
- HSE: Manual handling at work, a brief guide: See Great Britain's overview of assessing lifting, carrying, pushing, and pulling risks at work.
- CCOHS: Powered hand tools, drills: Review Canada's safety rules on choosing drill bits, clamping workpieces, and avoiding common drilling hazards.